To dig or not to dig, that is the question.
If your basement ceilings are too low, you have two options: dig the floor lower, or lift the house higher. Both option result in higher basement ceilings. This blog post will explain the pros and cons of each option. Depending on the configuration of your existing house, one option may make more sense than the other. Let’s DIG in:)
OPTION 1: DIG DOWN
If you dig down lower, there’s the obvious: cutting away the existing concrete floor and removing a lot of dirt from your basement. If there’s an exterior door in your basement (or an easily accessible giant window), you will have an easier time getting all of this dirt and concrete out. If you can somehow drive a mini excavator tractor into the basement, then it will be even easier. If you will need guys to use shovels and carry buckets a long distance to a dump truck, then things will be a lot more difficult (and expensive). So step one is getting all the debris out. If there’s a feasible path, then this might be the better option. If there’s not a feasible path, there still might be an option to make a temporary path by cutting a hole in the wall and making a temporary ramp. At some point, the temporary work might outweigh the cost benefit though. Remember, dirt needs to go somewhere. This means you need to have a way of getting it outside. You need some place to store/put it outside. If there’s no room for the dirt on your property, then you will need to hire a dump truck driver to drive your “spoils” to a dump location where they will charge a per-pound dumping fee. The best case scenario is a big yard for you to spread your soil, and a wide doorway to get it out of your basement.
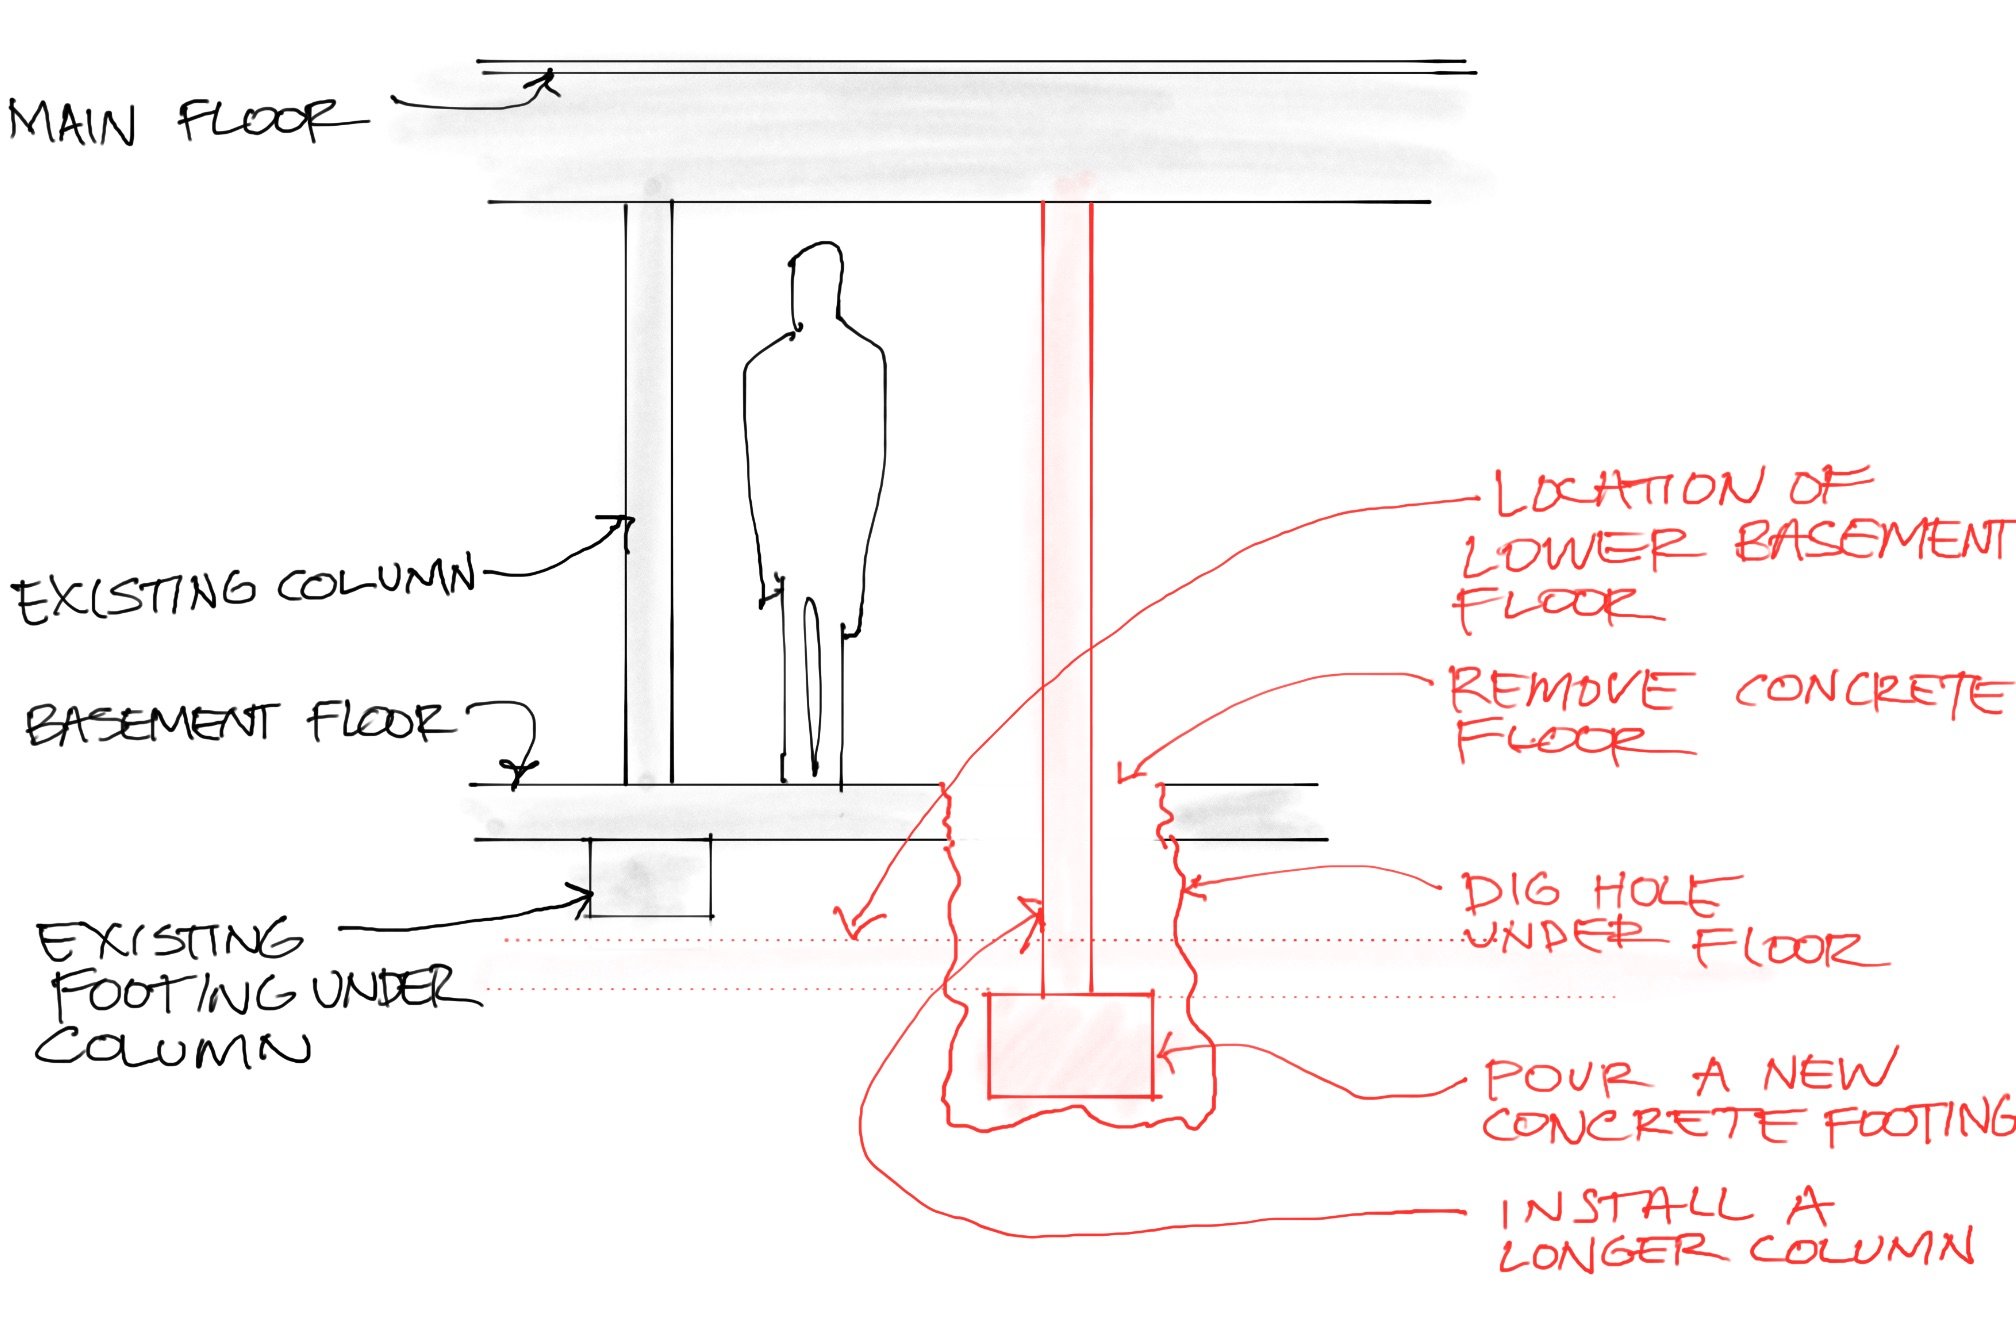
Once the soil has been removed, the next step is to support the house that is sort of dangling there since you removed all the dirt that was holding it up. Technically, this is not a “next step.” It is actually something that happens during the digging. The digging starts by digging down under some strategic points, so temporary deeper foundations and temporary longer columns can be placed to support the house BEFORE it ends up just dangling there. The diagram below shows the original column that can be removed AFTER the temporary deeper one is put into place. Ideally, this temporary column can be placed somewhere that it is permanent for the intended layout of the new basement. Also, hopefully this temporary column will not be in the way of the excavation efforts. Obviously, you wouldn’t want a column blocking the area that all that dirt needs to exit.
The red column is installed into a hole that is deeper than the existing columns, so you can later remove the short existing black column (and dig out the floor below it)
In addition to installing longer columns and removing the old ones that are too short, you also need to retrofit your foundation walls that are not deep enough to allow higher ceilings. This gets tricky. There’s two ways to do it: benching and intermittent digging.
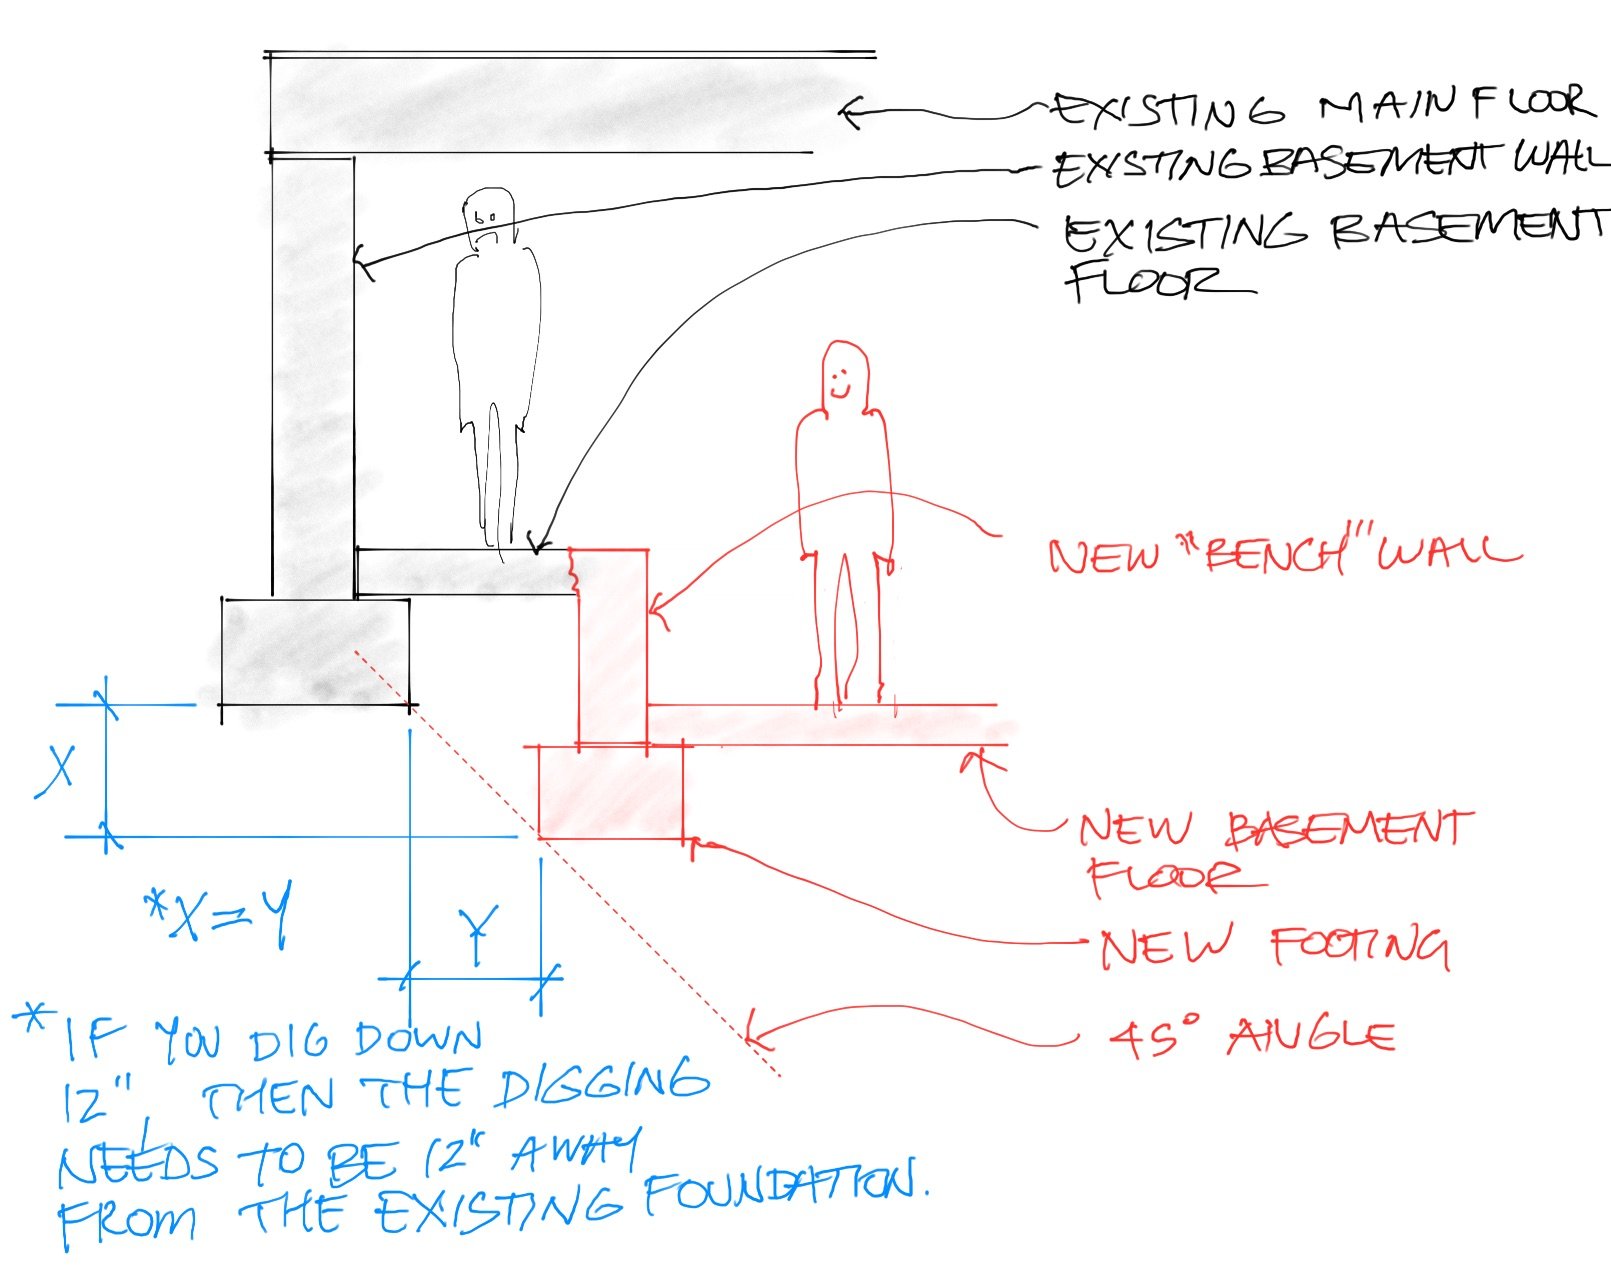
With benching, you just leave the existing foundation walls alone. You don’t do any digging near the existing walls. This allows the existing walls to still do their original job, but it causes you to still have areas with low ceilings next to those existing exterior walls. There is a 45 degree rule here. If you think back to math in school, a 45 degree angle is formed by a vertical line and horizontal line of the same exact length. When doing benching in a basement, this same rule applies. If you want to dig down 12”, then you need to do the digging 12” away from the existing wall. This means the digging is far enough away from the existing foundation that it won’t affect the structural integrity of it. Of course there are a lot of nuances to this, and structural engineering is required to get it all dialed in. The image below shows how the 45 degree angle rule applies to benching.
The bench created from the option above can create an awkward space, or it can create an opportunity with a bit of creative design work. In the past, we have used these as platforms for washer and dryers, a surface for an entertainment center, a seating surface, and we have even put built-in cabinets above them with fake cabinet panels on the bottom surface to make it look like it’s all one big cabinet. The benching method sacrifices a bit of floor space, but it is more cost effective than the next method: intermittent digging.
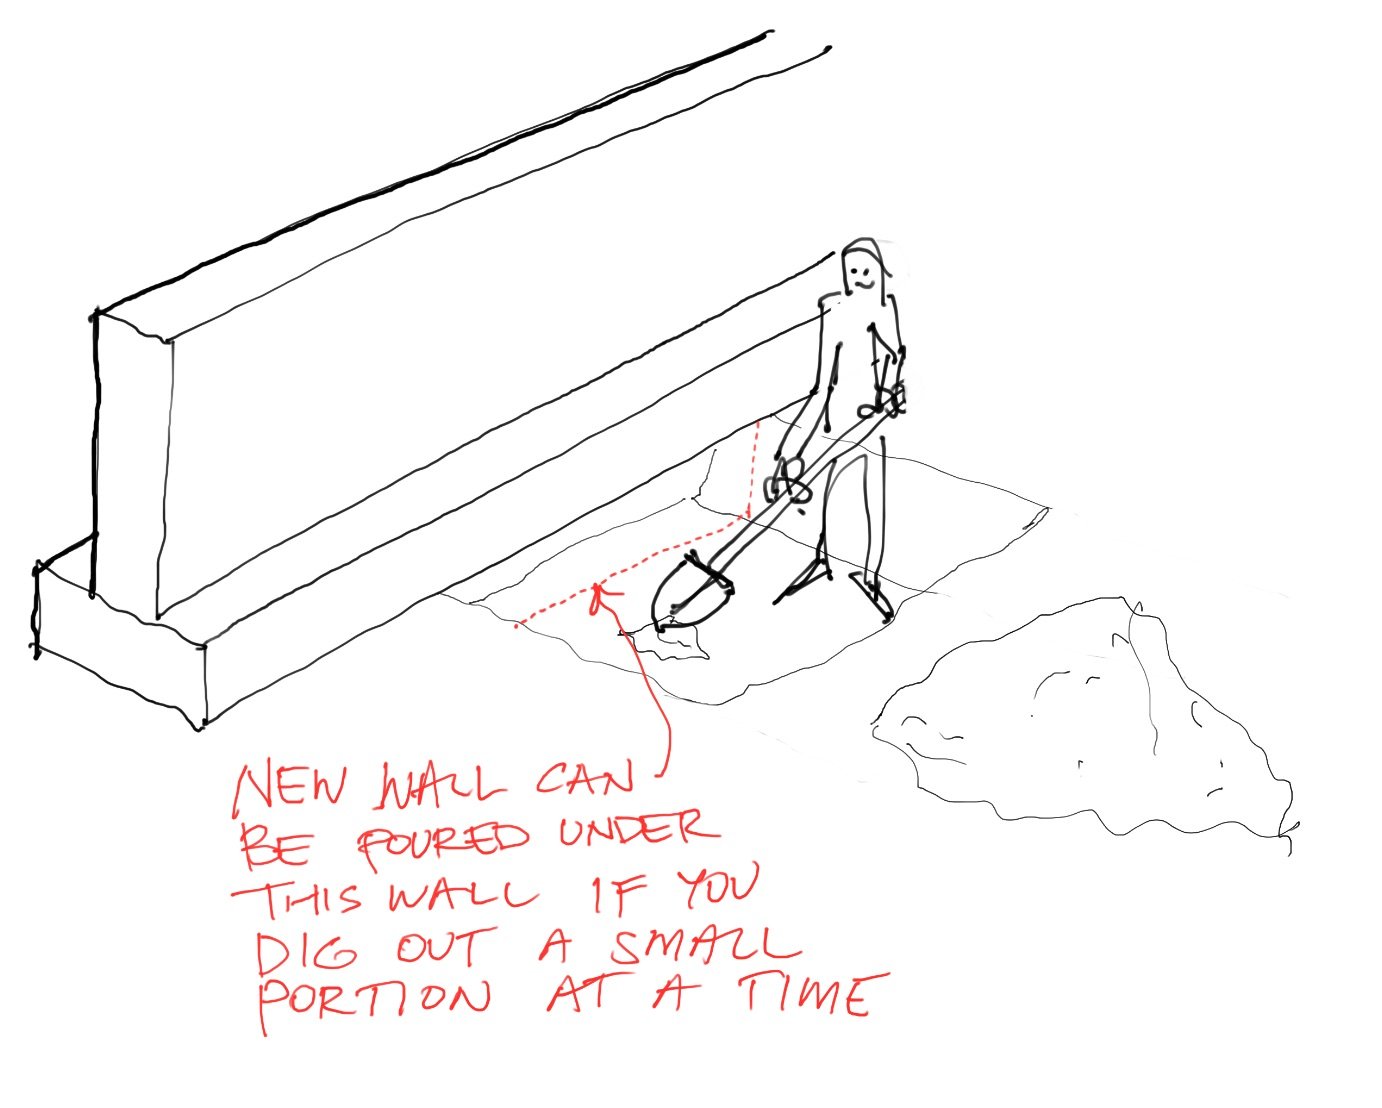
Intermittent digging is the process of sequentially digging below parts of your foundation wall while leaving other parts of the foundation wall in place (so it won’t cave in). I have seen structural engineers allow as much as 8’ long sections of concrete walls to be “undermined” (which means to dig out the soil below the wall). An 8’ long wall just hanging there is a pretty heavy chunk of concrete. In this method, the idea is to dig out a small part(s) of the wall(s), and pour the new concrete under those areas before digging out the rest of the dirt below the remaining walls. You are essentially just making the existing walls deeper, but that means removing the dirt below them - and the whole purpose of foundation walls is to allow your house to safely rest on the soil. For a period of time, parts of your house will rest on no soil! The image below shows how parts of an existing wall can be undermined to enable a new wall to be built below the existing one.
Intermittent digging allows you to make a wall extend further into the ground by digging under small parts of it at a time. You would form the concrete under that section of wall before digging under another section.
With intermittent digging, the process is slow. You can only dig away some of the dirt, since only a small part of a wall can be unsupported at any given time. Then you need to pour concrete under that wall and wait for it to harden before digging below other areas of the wall. Because of this sequential digging and pouring of concrete, intermittent digging is more costly than the benching technique. It is simply easier to do all the digging at once and to do all of the pouring of concrete at once. The cost of mobilization is very significant in construction. To get a concrete crew “mobilized” on site means tradesmen, their special tools, a concrete mixing truck (or mixer), and likely a concrete pump needs to be setup and eventually cleaned up on a jobsite. Doing this more than once significantly impacts the cost and timeline of the project.
Regardless of which method of digging you choose (benching or intermittent digging), how do you know if digging down to achieve better basement ceiling height is the best choice for your project when compared to the opposite method of lifting the whole house higher? When you dig down, every single item that touches the ground will need to be addressed. If you have a lot of columns in the basement, that is a lot of columns that will need extended in length. If you have poor access to the basement, that will be really difficult to remove the dirt and debris. If those two things are a consideration, then lifting the house may be a better option - but only if you don’t have a lot of the red flags that can come with lifting a house, which you will learn about next.
OPTION 2: LIFT THE HOUSE
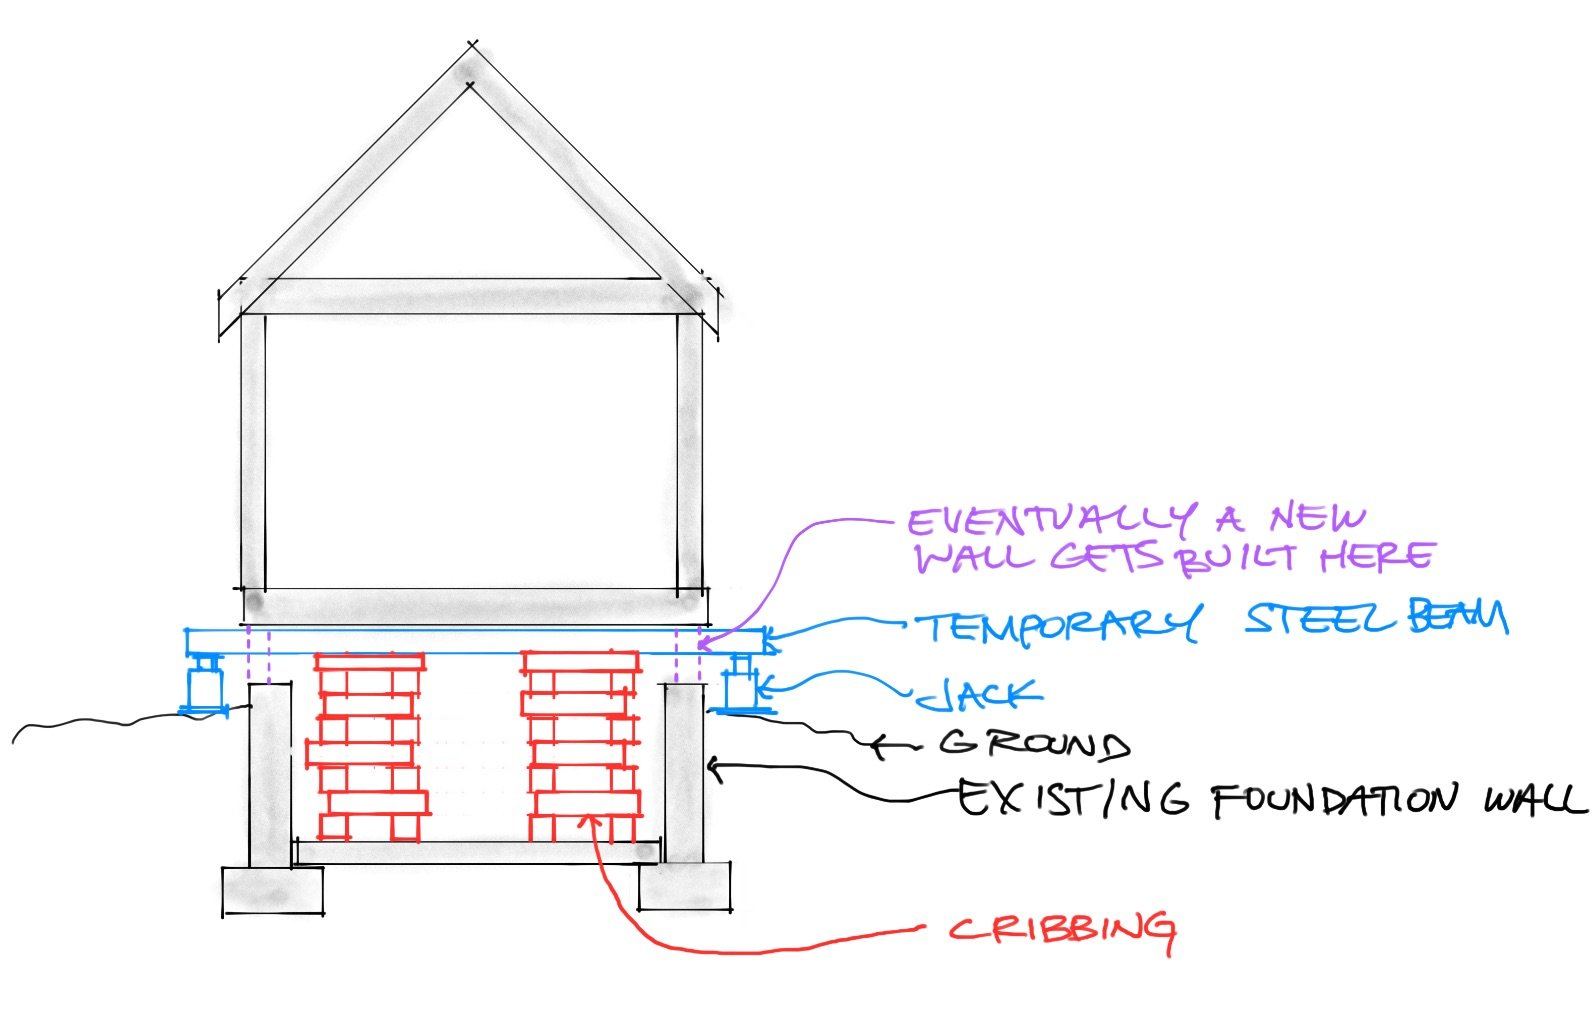
If you want to gain more ceiling height in the basement, lifting the house could be a valid option. Basically, you need to detach the house from its foundation, so the house can be lifted away from it. This means unbolting all of the fasteners that attach the existing wood framing to the concrete walls. Also, any columns in the existing basement (or crawlspace) will need to be detached, so the house can be lifted up without pulling them away from the concrete floor. There is likely also a bunch of electrical lines, plumbing pipes, and ductwork that will need detached too. Once all of the house is detached from the foundation, the next step is to slide some temporary steel beams under the house. Then jacks (like the jacks that lift a car) are placed below the steel beams to lift them up inch by inch very slowly. As the house is lifted away from its foundation, “cribbing” is installed below the steel beams, so the beams may rest on the cribbing to enable the jacks to be removed. Cribbing basically looks like wood pallets stacked on each other. They take wood timbers and stack them like a log cabin from the basement floor to the underside of the temporary steel beams. The cribbing provides a temporary support for the house while it is floating above its existing concrete foundation. The image below illustrates all these parts and pieces.
After you detach the house from the foundation, temporary steel beams can slide underneath the house, so jacks can lift it
The act of lifting a house is actually pretty simple. It’s the easy part. The more difficult stuff is all the nuances like extending wires, ducts, stairs/porches, and chimneys. For example, if you lift the house further away from the basement floor, your electrical wires don’t just stretch upwards. They need to be cut and re-wired. The same is true for your ductwork that leads to your furnace. A more difficult obstacle is porches. When you lift a house, are you going to lift the porch too? Probably not. It’s often easier to just rebuild a porch or deck than to go through the hassle of lifting it. If you lift your house a couple feet higher, that means you might need like 4 more steps to climb up into your house. This means the stairs that lead to your new porch need to be rebuilt. On small properties within urban areas, this could pose a problem since many homes are built tight up against their property line setbacks, so you may not be allowed to extend additional stairs away from your house and into a setback area. Additionally, if you have a chimney, it is not very feasible to lift a big, heavy pile of bricks. Usually, chimneys need to be removed when homes get lifted. A new fireplace will need to be built or omitted. The last challenge that relates to lifting is the damage that is likely to occur. When you lift a house, you do it fractions of inches at a time to minimize damage, but as things settle into place, plaster cracks, windows crack, tiles pop, and doorways can become pinched shut. All of those things will need to be repaired once the project continues.
CONCLUSION
To lift or not to lift? Maybe it’s easier to just move? Often it is actually easier to start over and just demolish the whole house. This is where an expert comes in. We have done many of these projects, and we can help advise on which method makes the most sense.
If you’d like to learn more about our design process, visit www.josharch.com/process, and if you’d like to get us started on your project with a feasibility report, please visit www.josharch.com/help


